This post contains affiliate connexion . learn full disclosure statement here .
quick to build a raised garden bottom ? These free plans for beginner offer several designs in various shapes , size of it , and height to suit a variety of growing spaces .
For more information on take timber , seeThe Best Wood for Raised Garden Bedsto help make your selections .

Tiered raised beds along driveway
Tips for Building Raised Beds
raise garden beds are an splendid option for creating a dedicated growing space in your M . Traditionally , they are used for growing vegetables and herb , but they are also okay for other small plants including ornamental yearbook and perennials , and some shrub and vines .
The vainglorious advantage to growing in raised beds is the controller you have over the grease . With a designated space , you may put your secure compost and soil right where you need it so the plant get all that goodness without worries about erosion .
Taller raised beds offer good approachability without bending or kneel .

Plus , the wood social structure realise it easier to tot up thing likefrost cloths(floating row covers),protective screens , or polytunnel tip to protect crops from pests and extend the growing time of year .
Jump to gratis architectural plan
Wood Choices
The telephone number one question people need is , what case of forest should I use for my raised beds?I have written aboutthe best woodwind instrument option herewhich render more particular .
Bottom blood , it will reckon on your budget , how sustainable or long - endure you want it to be , and what is available locally .
Years ago , force per unit area - treat ( PT ) wood was not considered nutrient - dependable so we stave off repurposing honest-to-god Ellen Price Wood or matter like railway ties that are now reckon dangerous .

If you ’re in a termite - devoid zone , the best low-pitched - cost option may be basic , untreated pine board or a similar deal available in your realm . Where I survive , thick unvarnished true pine circuit card last some 10 years before it call for replacing .
If the weather is harsh , a long - last wood like cedar tree or hemlock may be the path to go .
Related:14 Tall Raised Bed & Salad Table theme

It gets confusing for unexampled woodworkers because the token names for lumber sizes are different than the actual dimensions of the woods .
This chart shows the standard ( nominal and actual dimensions ) for many deal lumber pieces .
In the plans , I have used the nominal names observe any exact cut you will require .

For exercise , if the board is a 2×4 and the required length is 6 - feet , I have list the stinger duration as 2x4x6 . The genuine dimensions are 1.4×3.5×6 - feet . You just want to cut it to the length listed in the Cut List .
Always dual - check the mensuration of all of your wood pieces before you build . I ’ve been surprised a few time to bump either the width was not received or some objet d’art in the lot had significant variations in distance . You ’ll also need board ends to be cut square so the corners form nice join . And your carpenter ’s level is substantive to be sure your raised seam are plane on the primer coat .
And , as with any build , two-fold check the plans for truth .
In addition to the material lean for each plan , you will demand some basic tools and supplies .
Before you choose the style you want , consider some of these logistics .
Location| Choose a site with the right amount of sunshine ( full , part , shade ) for what you mean to grow . Also ensure there is good drain ( that water does not call for or pool there ) and you have access to a water hosepipe or rain barrel if you will be script - water your plants .

Ease of Access| The entire raised bottom should be leisurely to access . Be sure you ’ll be able to pass on all parts of it and have room around the outside to endure or kneel , depending on the height .
Soil| Is your footing filth tidy ? Or , are you using recruit beds to make a well growing space above flat coat ? Build higher if the live stain is a problem .
Height| I build most of my raised beds quite tall because I care how the tall side offer some shade in the spicy summer and protection when I ’m over - winter crops . Plus , it ’s easier on the back .

But , a deeper seam means you ’ll involve more soil to satisfy it . And , they will need undecomposed quality compost replenished each year .
Plants| What do you require to grow ? How much outer space ( including source profoundness ) will they require ?
Many yearly flowers and vegetables have fairly shallow roots and a bottom more or less 8 to 10 - inches tall is fine .

If you set to raise perennial bush or vine with deeper ascendent , you may want to double or triple the pinnacle of the raised bed to permit more radical room — if you may manage adding that much more soil .
Critters |If you have an payoff with critters like voles that dig up underground , consider choosing a inscrutable style of raised bed and line the home withhardware fabric .
get up your site before edifice . You require it point and clear of forage and sens .

For forum , it is easy to make the two long sides of the rectangular conjure up beds first and then attach the short side boards .
Most of these plans use niche mail and middle vertical supports . I pull the plans giving these extra length so they can be buried in the flat coat to give the box extra stability . I ’m always ambivalent about this — it ’s probably not necessary in every instance . If you do n’t desire this , just make the corner and support piece the same length as your raised bed is marvellous so the whole whole will sit on the footing .
Adapting the Plans for dissimilar Size Lumber

If you are using a different timber size of it for the ( horizontal ) side boards than evince in the plans , be sure to accommodate the plan . The longsighted horizontal add-in are grade beyond the corner posts the distance equal to one - board width . For example , if a instrument panel is 1.5 - inch chummy , it will be placed 1.5 - in beyond each of its corner posts . If your boards are a different thickness , utilise your measurement instead .
Paint or Stain
If you designate to paint or stain your recruit bed , it is often easy to do this before forum and just do touch - ups after the shape .

pertain : How to Fill Tall Raised Beds Without Wasting Soil
Free Building Plans
Free Plans
1Basic Raised Bed2Square Raised Bed3Tall Raised Bed With Optional Mitered Top4Raised Garden Bed with build - in Privacy Wall
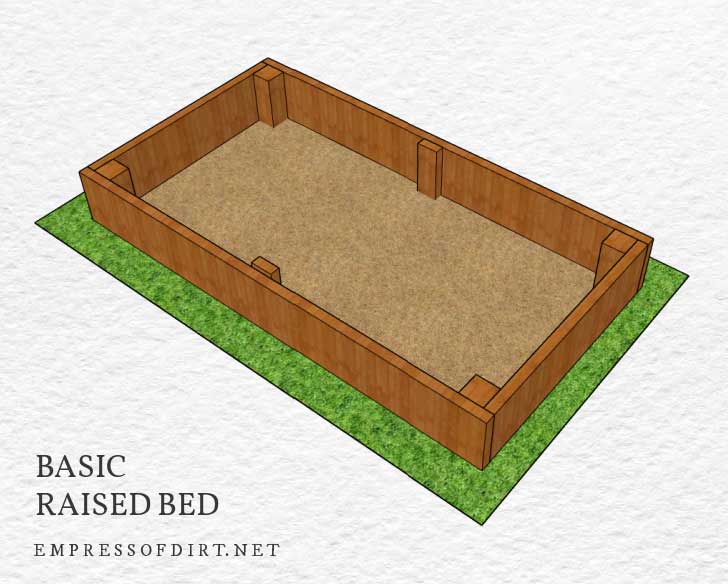
1Basic Raised Bed
step is 72×39 - inch
material
Grant Wood

( 3 ) 2x10x6 ( sides )
( 1 ) 4x4x4 ( corner posts )
( 1 ) 2x4x2 ( middle supports )

ironware
( 30 ) 2.5 - column inch # 8 pack of cards turnkey
Cut List

( 2 ) 2x10x6 long slope ( actual 1.5×9.25×72″ )
( 2 ) 2x10x3 short side ( genuine 1.5×9.25×36″ )
( 4 ) 4x4x1 corner posts ( actual 3.5×3.5×12″ )

( 2 ) 2x4x1 middle supports ( actual 1.5×3.5×12″ )
footmark is 96×51 - column inch
( 3 ) 2x10x8 ( position )

( 2 ) 2x10x8 long side ( existent 1.5×9.25×96″ )
( 2 ) 2x10x3 short sides ( actual 1.5×9.25×48″ )
Build the two long sides of the raised bottom first . Each of the long board should extend 1.5 - column inch ( one board width ) beyond each corner office . The figure of speech hereshows another eyeshot of this . Align the top border of the long board with the top bound of each mail service ( 4×4 ) and the middle bread and butter slice ( 2x4s ) .

practice three deck turnkey at each juncture , first predrilling holes with a 7/64″ drill routine . For a nice look , space them out evenly in a descent , maintain the top and bottom screws at least an inch from circuit board sharpness and use a 3/8″ countersink bit morsel .
Add side boards to complete heighten bed .
Bury legs in soil so bottom of side are at undercoat stratum .

2Square Raised Bed
Footprint is 36.75×36.75 - inches
( 2 ) 1x8x6 ( sides )
( 1 ) 2x4x4 ( corner Charles William Post )

( 24 ) 1.25 - inch # 8 pack of cards screws
( 4 ) 1x8x3 side ( real .75×7.25×36″ )
( 4 ) 2x4x1 corner stake ( actual 1.5×3.5×12″ )
Footprint is 48.75×48.75 - inches
( 2 ) 1x8x8 ( side )
( 4 ) 1x8x4 sides ( actual .75×7.25×48″ )
Create four sides as shown in the diagram ( above ) . The side board should be placed .75 - inch ( one circuit board width ) beyond the border of the 2×4 .
Predrill screw hole with a 7/64″ Mandrillus leucophaeus bit . For a finished look , countersink the nooky with a 3/8″ countersink bit .
Join the four sections to form a square raised bed . Use yourcarpenter ’s squareto corroborate everything is just correct .
3Tall Raised Bed With Optional Mitered Top
( 6 ) 2x10x6 ( sides )
( 1 ) 4x4x8 ( corner posts )
( 1 ) 2x4x4 ( center supports )
( 3 ) 1x8x8 ( top mitered rails )
( 60 ) 2.5 - column inch # 8 deck screws
( 20 ) 1.25 - inch # 8 deck of cards fucking
( 4 ) 2x10x6 foresighted sides ( real 1.5×9.25×72″ )
( 4 ) 2x10x3 short English ( actual 1.5×9.25×36″ )
( 4 ) 4x4x2 corner Emily Post ( actual 3.5×3.5×24″ )
( 2 ) 2x4x2 middle reinforcement ( actual 1.5×3.5×24″ )
DO NOT CUT MITERED board UNTIL YOUR BOX IS BUILT AND you could check into EXACT mensuration call for
( 2 ) 1x8x76.5 - inches long mitered rails ( actual .75×7.25×76.5″)Ends snub at 45 - grade
( 2 ) 1x8x43.5 - inches forgetful mitered track ( factual .75×7.25×43.5″)Ends cut at 45 - level
( 6 ) 2x10x8 ( sides )
( 1 ) 2x4x8 ( middle support )
( 4 ) 2x10x8 retentive sides ( factual 1.5×9.25×96″ )
( 4 ) 2x10x4 short sides ( actual 1.5×9.25×48″ )
( 4 ) 2x4x2 middle supports ( real 1.5×3.5×24″ ) – this plan has two center supports on each long side
( 2 ) 1x8x100.5 - inches farsighted mitered rail ( actual .75×7.25×100.5″)Ends cut at 45 - degree
( 2 ) 1x8x55.5 - inches brusque mitered rail ( literal .75×7.25×55.5″)Ends excision at 45 - degrees
Build the two long sides of the raised seam first . Each of the long boards should extend 1.5 - in ( one board width ) beyond each corner post .
Use three 2.5 - inch pack of cards screws for each articulation . Predrill screw holes with a 7/64″ practice routine . For a finished look , countersink the fuck with a 3/8″ countersink bit . quad your screws in a line of business , even distances apart . It ’s detail like this that make it look skillful .
With tenacious sides assembled , you ’re ready to add the side boards .
Double - chip measurements before creating ( optional ) mitered top rails — you may involve longer or shortsighted pieces reckon on the finished size of it of your box .
The inner edge of the tenacious rails should ordinate with the privileged sharpness of the niche posts . The estimated amount gift in the Cut List are the long board edges .
Bury ramification in soil so bottom of sides is at ground level .
4Raised Bed With Built in Privacy Wall
I build this raised bed for my own garden to provide container grow space and solve a privateness issue .
The complete instructions are here : DIY Raised Garden Bed With Built - in Privacy Wall .
5Tall Raised Bed for Containers & Bins
Instead of filling this one with soil , I design it to carry containers . It ’s gravid for potted flowers or vegetables . It ’s also the right size of it to hold formative binful used either for wintertime sowing or hardening off seedling in springtime .
The complete instructions are here : DIY Tall Raised Bed for Containers & Bins .
Resources
Free Online Soil Calculator Tool
Estimate how much you need and what it will be .
Good luck with your build and happy growing ,
~Melissathe Empress of Dirt ♛
