Home»Garden
Last Updated on August 10 , 2023
I require to start off by apologizing . When I first exhaust ourBeginner ’s Guide to Using a Hobby Greenhouse , I enthusiastically anticipate that a tutorial on how to establish a nursery pot judiciary was “ on the style presently ! ” Welp … that was over a yr ago now . My badness ! So , I ’m very sorry it has taken me this long to write this up for you .

See , I was waiting because we had design to build a new potting bench and written document thestep - by - step processfor this tutorial . We have n’t done that yet , so I put off sharing . However , a college buddy of mine recently reached out to ask how we built our greenhouse benches ( after he saw my unrealised hope on the greenhouse article … lol ) . I admitted I was relax , but sent him some tips along with many exposure of our complete redwood benches to use as a template . Not only did he nail the design , but he took a crew of progress film for us to share here . give thanks you Luke !
revealing : This post may contain affiliate link to products for your convenience , such as to items on Amazon . Homestead and Chill hit a small commission from purchase made through those links , at no extra cost to you !
Would you like to save this?
We ’ll e-mail this mail to you , so you may come back to it later !
I check to experience email update .
DIY Greenhouse Bench Design: General Notes and Alternatives
What type of wood should I used to build a greenhouse potting bench?
Our greenhouse pot bench or table are fabricate withredwood lumber(a compounding of heart and common ) , which has excellent natural rot - resistance . Cedaris another great choice . In oecumenical , hardwoods like redwood and true cedar have higher-ranking durability , termite - resistance , and an increase lifespan than softer woods like true pine . Since your greenhouse benches in all likelihood wo n’t be in direct touch with food and stain , you could use deal timber if you want ( unlikeconstructing a raise garden bed , where I advise against that ) .
Should I seal the wood?
As you could see in the photos , the tops of the benches are slot with place between the wood board to set aside water to freely drain . Even so , our benches do n’t get A-one wet very often . We keep the legal age of our glasshouse seedling and plants nestled inside 10×20 tray or with other disk below , so there is n’t water supply running onto the benches on a unconstipated basis . Because of this wechose not to sealthe redwood and simply left it raw , as - is from the store .
If you happen to endure in a very humid surround , or if you plan to water in a manner that is always drain onto the Bench , you may require toapply a sealerorwood oilto help protect them . Or , if you ’re implicated about keep their appearance . When our greenhouse benches get wet ( particularly with dirty weewee ) it does leave water mark or light stains on the Sir Henry Joseph Wood . But we do n’t listen , and the mark could also well be sanded away .
Other options
As an alternative designing , you could also build a glasshouse potting bench with a wire top instead . employ our intent to make a similar frame / base , and then unattackable sturdygalvanized ( rusting - proof ) wireon top of the work bench or else of Grant Wood slats . Be sure to include the horizontal top supports so the wire wo n’t sag though ! This general plan can also be used to create bench or table for other applications . For example , we used a very alike process to build our DIY potting bench – just a spot taller , deeper , and with a strong woods top . ( Photos of our potting terrace are include below )
Greenhouse Bench Sizes
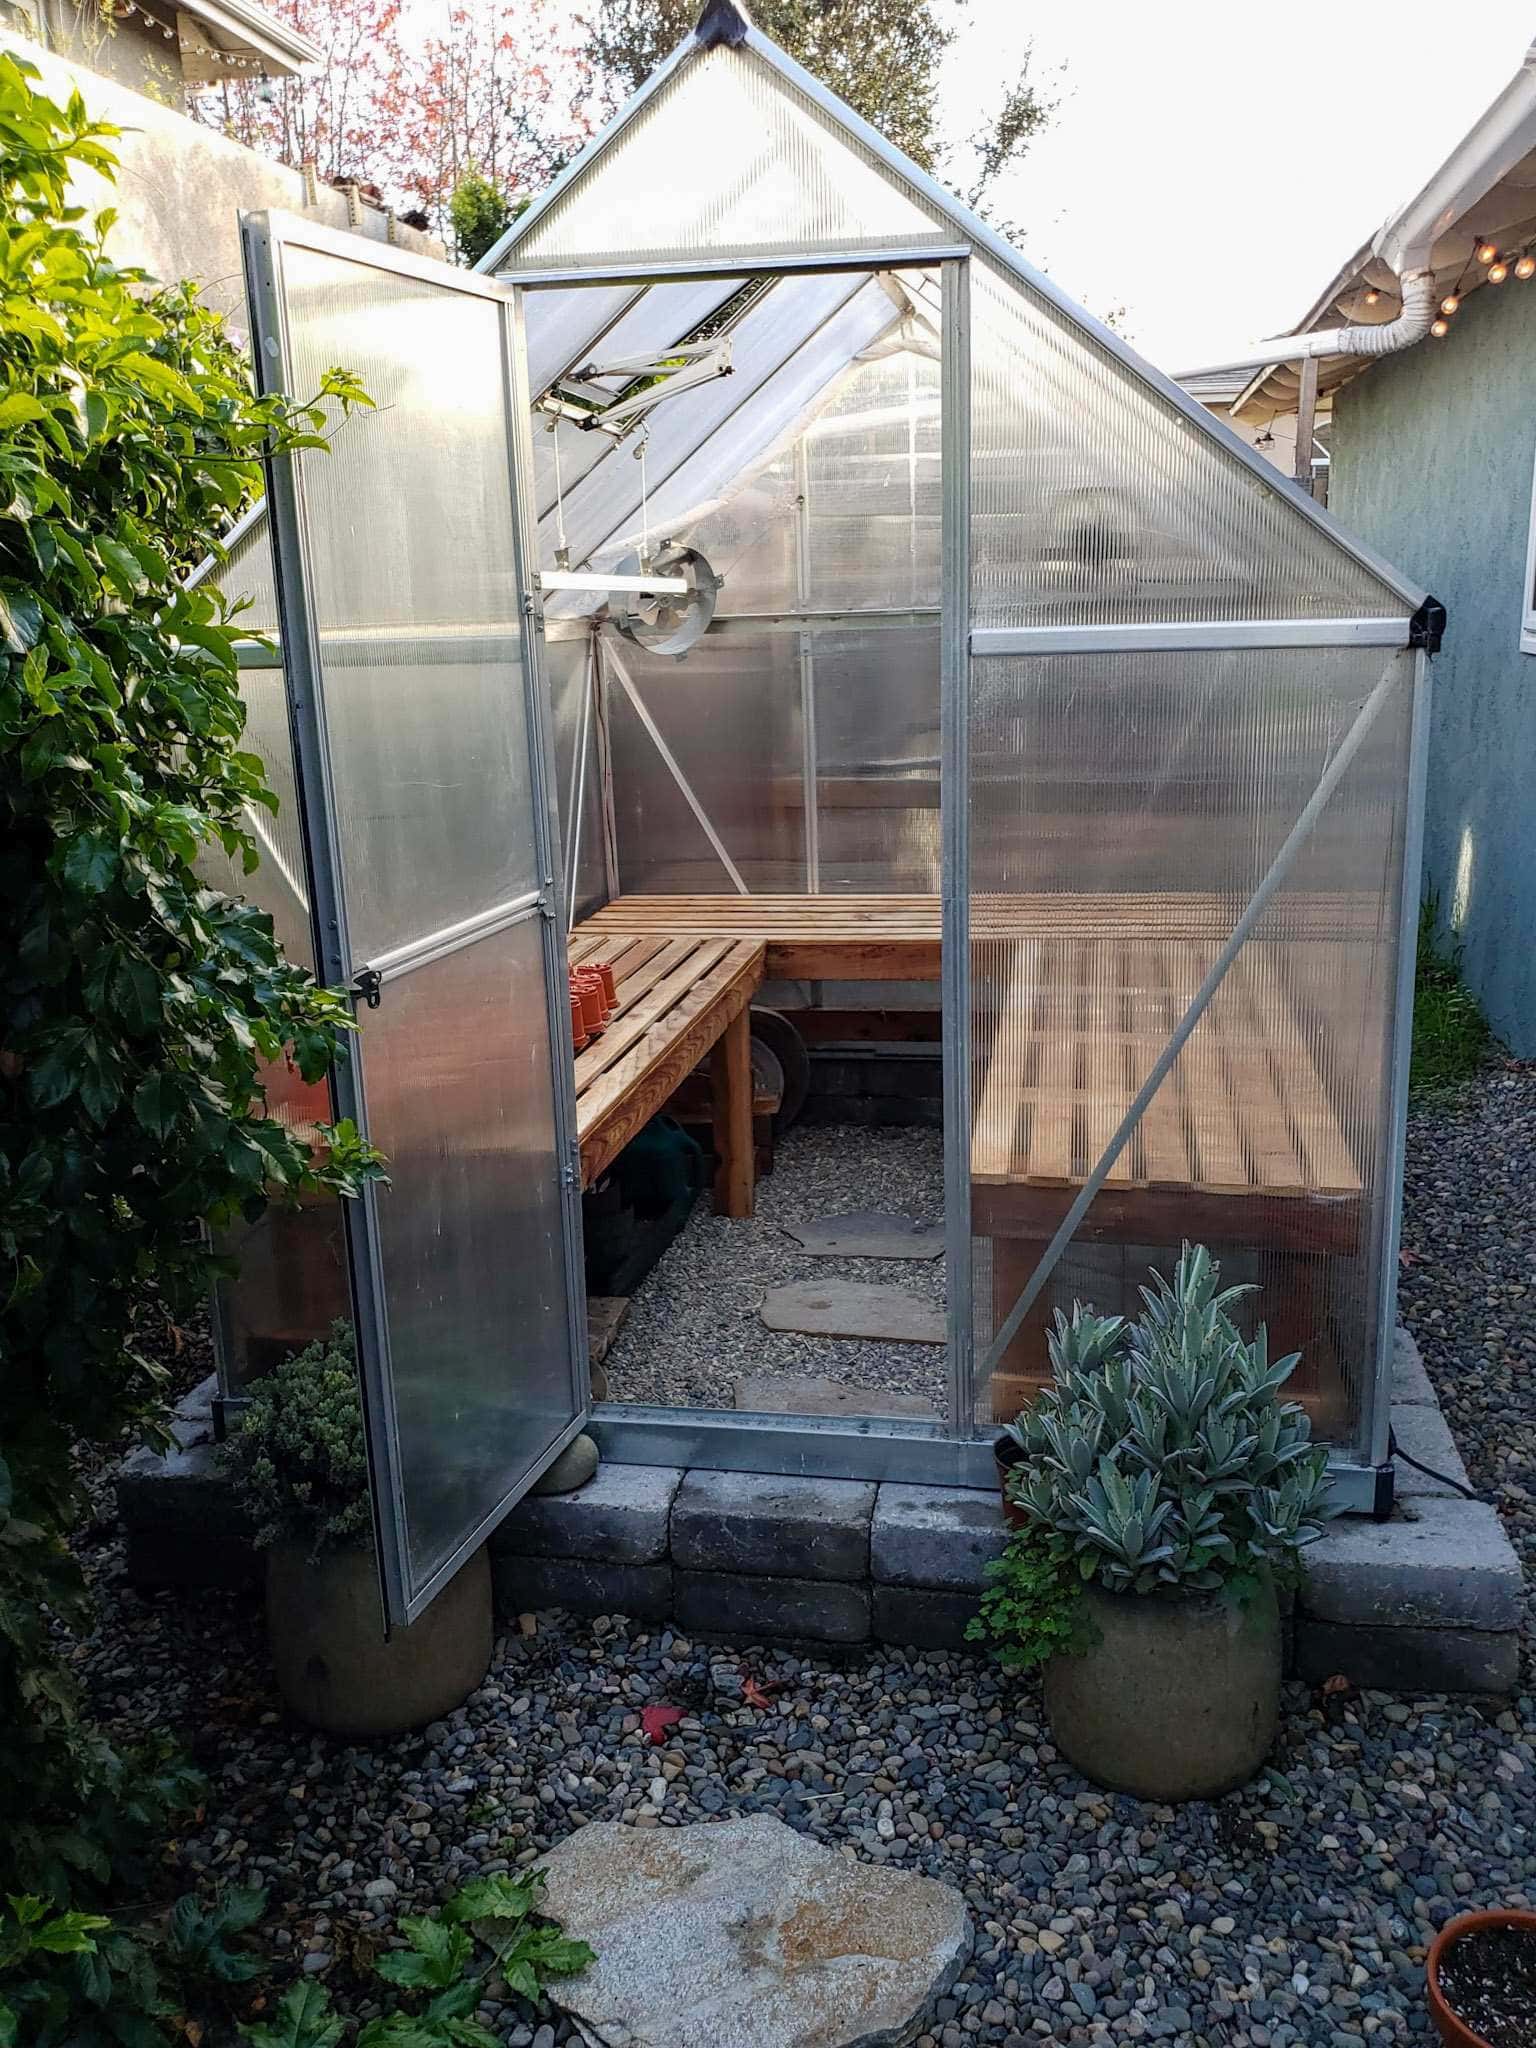
Our greenhouseis 6 feet all-encompassing and 8 foot farsighted . So , we built two benches that are 68 inches farsighted ( just shy of 6 infantry ) , 22 column inch encompassing , and 28 inches tall to equip along the side walls , and one bench that is a shade wider but shorter to check along the back bulwark ( 66″ long and 24″ full ) . See the photo below .
Use this general purpose to build a greenhouse potting judiciary of any size . appraise your place , and do whatever best fits your glasshouse ! Here are some considerations when opt dimensions :
Length
We designed our bench to maximize every inch of usable space inside . Together , the three benches ( just under 6 understructure long each)create a U - shapethat lines the three side of our greenhouse , with just enough space to work between them and the entrance . My buddy Luke followed a similar layout as ours , but on a expectant scale . In his 8×12′ greenhouse , he built a bench that is just under 8 feet for the back rampart , and one just under 9 feet for the side . Do keep in mind that the longer they are , the heavier and more awkward they ’ll be to move or rearrange .
Width
We prefer for22 - column inch wide(deep ) benches for a pair of reason . One , that is what match best in our fairly belittled nursery while still supply room to move around . Also , we study the size ofaverage seedling suppliessince that is what we primarily use our nursery for – raising veggie , flower , and herb seedling for the garden . Mostseedling high temperature matsare just under 2 feet full , design to equip common10×20 traysused for holding container of seedling . ( 10×20 tray get their name from their dimension ) . in conclusion , about 2 feet is a comfortable breadth to gain across . Yet if our greenhouse were wider than 6 foot , we may have made the benches a tad wide like Luke ’s too .
Height
Our greenhouse benches are about28 in tall(28.5″ once the final top boards are instal ) . Standard table height is 28 to 30 inch . This stature works utterly for raising seedlings and is well ergonomic to work around . Luke is a tall dude and also has a taller glasshouse , so he constructed his pot benches at 34 inches tall .
Take into history the types of works you intend to turn , and the overall stature of your glasshouse . I have also look much shorter greenhouse bench , which will provide moreheadroomabove for tall plants – such as pottedtomato plants , cannabis plants , or similar lanky ally . Of course , large potted industrial plant could also be set the right way on the trading floor of the greenhouse .
to boot , our glasshouse is located in a tight stain between our theatre and a fencing . hold on the plants up off the floor provides them the most natural light and less shade . We also build and installed our nursery on top of a 12 ” tallhomemade concrete block foundation , which hold us an additional foot of clearance inside .

Supplies Needed to Build a Greenhouse Potting Bench
INSTRUCTIONS
1) Plan & Prep
I suggest work on a flat and story surface , such as a table , work bench , concrete patio , or service department floor to work up your nursery pot bench . Make asketchof your design if that help you , and jot down the measurements .
Start bycuttingthe four 4×4 legs and table top frame baseball bat ( four pieces ) to your desire dimensions . In our design , the four 4×4 leg measure 28 ” grandiloquent , and the top frame consist of two 68 ” 2×4 ’s and two 21.5 ” 2x4s . We waited to measure , curve , and infix the additional board top and leg livelihood until after the main frame was assembled .
Note : Keep in mind that depending on how you delineate up your outer frame boards , the benchcould advance or suffer a twosome inchesin either direction . See the photos below to see what I mean . Most 2×4 ” instrument panel really evaluate 1.5 ” by 3.5 ” . So , if you crest the ends of your long display board with the shorter ones , the bench will end up being 3 ” longer ( 1.5 ” on each final stage ) . This matters if you ’re work with a very fuddled quad / fit like we were , and could also change how long your slatted benchtop boards require to be cut . Therefore , cut your longest control board at 69 ” inches rather than 72 ” if you desire to build a greenhouse potting bench that is exactly 6 feet long once over .
2) Assemble the Bench Frame and Legs
Secure a 4×4 leg ( for sum of 2 ) at each end of your tenacious 2×4 add-in . It ’s easiest to consist the 2×4 ” on top of the legs . See the photograph below . The 2×4″ should be wealthy at the top of the 4×4 ” legs , and arrange perpendicular to one another . Use a carpenter square to ensure everything is square . Or , valuate the distance between the top and bottom of each match leg to check they ’re equal ( straight ) .
We secure the lumber together with deck screws ( two screws per junction ) , which we find can be easily screwed in with an electric drill without making pilot cakehole first . Repeatwith the second long 2×4 ” dining table and remain two legs .
Next , put up the two long sides of the bench upright and attach the short close to complete the orthogonal material body . You could do this right - side up , or upside down with the bod on the earth and legs in the air . Whatever is easy for you . Before securing the short side , ensure that the legs are allstraight and evenly spacedas you did before . Now , sequester the shorter 2×4 dining table to each branch in the corners .

take down : You could also do this whole performance in reverse , and confiscate the shorter side to the leg first , then attach the retentive front and back . Your call ! Truth be told , I recall that is what we did . It was over 4 years ago now …
3) Add Leg Supports
Now we need to give this thing some excess stability withthree horizontal supports . First , add a gameboard between the leg across the backside of the terrace , about midway down the legs . Next , do the same on the two brusque sides . look on how you forgather the top of the bench , the side supports may be slightly shorter ( 1.5 column inch shorter ) than the top frame piece on the same side because you need to keep it moneyed with the front side of the branch . There will not be a support across the front of the workbench , which leaves the underside easily accessible for lay in item below your bench . Secure the supports to the leg in the same manner as the top frame .
Variation : You could also secure the side supports along the interior of the 4×4 leg , making it easier to create a lower shelf if you so desire . This is what I did when we build our pot workbench ( photo below ) .
4) Add Benchtop Supports
Next , enter several horizontal support inside of the benchtop chassis . One supportevery 13 to 18 inchesis sufficient , so simply play around with your bench dimensions to see what lick best . For our 68 - in prospicient bench , we add a sum of four support , about every 13 to 14 inches . Luke ’s retentive bench was 106″ , so he impart a totality of 5 supports every 16 inch on that one .
Measure and trim the supports to fit the interior distance between the long top boards . I always mistake on the long side – it’sbetter to have a smashed fit(or have to shave a little more off ) than stop up with too - brusque of reinforcement boards . If needed , softly tap the supports into lieu with arubber mallet . We installed our support piece with the encompassing flat side of the 2×4 ” facing up . Secure them to the outer frame with deck screws ( or interchangeable ) .
5) Install Benchtop Slats
Now it ’s time for the final finishing step ! thin your lissom top boards to the same distance as your benchtop . We kept ours flush with the top frame since we were after a precise and tight fit . Or , you could make them a few inches longer – with a slight overhang on each oddment .
Place the boards on top and decide on the spacing you like between them . We leave approximately1 in of spacebetween each panel . Once you figure out the layout , I suggest attaching the very front and back edge board first , and then evenly space and secure the inner board between them .
Secure the top slat to the frame below using trim top dog finishing roll in the hay . deploy the screw propeller so that they ’re flush or sunk just inside the Earth’s surface of the wood , creating a smooth and snag - free finish .

And… you’re done!
Now , all you need to do is move your nursery pot benches into their young habitation . Our terrace are slightly wider than the threshold itself , so we had maneuver them in sideways and legs - first … pivot , anyone ? Finally , sit back to look up to your beautiful craftsmanship with a nice frosty brewage ! Or , homemade kombucha . Or a cup of deliciousgourmet loose - leaf tea . Whatever suit your partiality . You deserve it !
I hope this tutorial on how to build a glasshouse pot bench was helpful and easy - to - follow , and will enable you to swimmingly make your very own squawk - butt benches . Please let me roll in the hay if you have any questions , and feel free to spread the love by sharing this C. W. Post . Thank you so much for tune up in . well-chosen building !
Do n’t miss these have-to doe with articles :


